Tuesday, December 25, 2012

Treat: Gingersnap Cookies


Merry Christmas!

I hope you’re well-fed and have had a wonderful day with your friends and/or family! If you still want a last minute dessert (or just want more cookies for the after Christmas season), I bring this blog to a close with a recipe for some of my most favorite cookies ever: ginger snap. These cookies go by quickly in my household, which may or may not be a good thing. I hope you enjoy them too!

 Ingredients:

1 cup Butter, softened
2 cups Brown sugar, firmly packed
1 Egg, well beaten
1 cup Molasses (I highly recommend Brer Rabbit brand)
4 cups All-purpose Flour
½ tsp. Salt
2 tsp. Baking Soda
3-4 tsp. Ground Ginger
1 tsp. Vanilla Extract
1 tsp. Lemon Extract or Lemon Juice
Sugar (for rolling)

Begin by creaming your butter. As you cream, gradually add brown sugar. Beat in your egg, as well as the molasses until mixture is light and fluffy.

In a separate bowl, stir together remaining dry ingredients. Blend into butter mixture along with vanilla and lemon extract. Allow to chill until dough is easy to handle (not sticking to your hands as you roll).

Roll into balls and roll balls in sugar, coating them lightly. Place balls onto cookie sheet and bake for 11-15 minutes (shorter times for softer cookies) at 350 degrees Fahrenheit. Place on racks to cool, and then scarf down with a cup of hot coffee. =)

Until next time~

Merry Christmas!

Monday, December 24, 2012

Decor: Festive Nails


I’ve recently become somewhat obsessed with nail polish; and while I typically prefer a more traditional, plain matte nail polish, I couldn’t resist succumbing to the current trend of festively decorated nails.  

I’m going to be honest, my first design attempt was actually supposed to be swirled “peppermint” using a deep red and silvery-white polish…but it didn’t turn out—at all. So instead, I’m paying homage to the birth of our Lord, Jesus Christ.  Fitting, seeing as it’s the day we celebrate as His birthday tomorrow. =) So, without further ado, I bring you “Night Sky in Bethlehem”:

First, start by painting a background using a dark blue color. I’m using two coats of Lóreal’s Jet Set to Paris. I'm not a perfect nail painter, so I've gotten a bit over my nails, but that'll go away within a day or so. 

Now, take a silvery white color (like Butter London’s Pearly Queen), and place a few drops on a paper plate. Grab a toothpick and begin your design.

On your thumbnail, draw a cross. Then, draw an “x” intersecting at where the two line of the cross intersect. This is your star of Bethlehem.

On your other nails you can either dot with the silvery polish—or if you’re more patient than I, draw mini stars on them. Either will work. Repeat these designs on your other hand and allow to dry.

Paint over nails with a clear topcoat; while wet use a fan paintbrush dipped in white glitter and sprinkle glitter heavily over nails. For less mess, do this step over a garbage can. =) Allow to dry.

Finish with one more coat of clear gloss, allow to dry, and you’re all done! Have a Merry Christmas Eve!

1 Day Until Christmas!

P.S. I know I promised more cookies for today, but they'll be tomorrow's post instead. =)

Sunday, December 23, 2012

Treat: Traditional Scotch Shortbread Cookies


Christmas is synonymous with cookie; and while some may have already overindulged in this treat, the last mine has eaten were the Spiced Pudding Cookies I made at the start of the month (I think).  With that said, my favorite thing about Christmas cookies is that they tend not to be the typical chocolate chip; so even if you have had a few too many, you’re less likely to get too burnt out on them if you’re switching things up by making an array of the seasonal flavors.

This shortbread cookie is incredibly buttery and mild—making it the perfect accompaniment to a hot cup of tea.  I also think they’d be great if you jazzed them up with some lemon zest, or sprinkled coarse sugar on them.  And I know I say this a lot, but this recipe is so easy! Just look at the ingredients list!

Ingredients:
1 cup Butter, softened
¾ cup Confectioners Sugar
2 cups All-purpose Flour

Begin by creaming the butter until it’s light. Then add sugar and beat until fluffy. Mix in flour until you have made a soft dough. This is easiest when done in a warmer room—it makes the butter more manageable.
Now for the trickier part: over wax paper, roll out dough using rolling pin. I recommend sprinkling a little bit of confectioners sugar on the top of the dough before rolling.  

You can either cut through the dough with cookie cutters, or (if you don’t have any) cut your dough into squares by creating a grid pattern with a large utility knife.

I wanted to give these cookies character so, using a toothpick, I poked the letters “J”, “O”, and “Y” into the cookies (one letter per cookie) along with a small border in each corner.

With some of them, I pushed in the corners like you would a pie crust for a more rustic look.

Lastly, I cut the corner from opposite sides of the square to create a diamond design.

Bake in oven set at 325 degrees Fahrenheit for about 20 minutes, or until cookies are lightly (very lightly) browned at the edges. Allow to cool, and remove into jar, tin, or if you’re giving them as a gift, a gallon sized Ziploc bag.

 Tonight was an overall cookie night, so my mother and I made these as well as another type, which I will post tomorrow. =)


2 Days Until Christmas!

Saturday, December 22, 2012

Gift: Christmas Cards


As you may be able to guess, I love Christmas. I love the cozy feel of the lights from candles and decorations, I love the small personal touches here and there that just seem to make everything a little nicer. I love the smell of pine, etc., etc., etc. But there is one thing about Christmas that I don’t really love, and that’s the way some things need to be done by a certain time. This is probably my procrastinating side talking, but I find that certain Christmas traditions slip through my fingers; and by the time I’m thinking of them, it’s just too late. Some examples of this are: homemade fruitcake (which needs to be started around August), actual advent calendars (done and given by December 1st), and the one I always seem to fail at: Christmas cards (typically given mid-December).


I don’t know why I’m so bad at giving out Christmas cards, but I never seem to get around to the thought of them until a few days before Christmas; and by then it seems either rude or pointless to hand them out.  Foolishly I expected this year to be different, but alas, it’s 3 days until Christmas and I haven’t sent even one.  The good news is, if you’re handing them out in person, or shipping a gift (which by now would be late anyways), you can still give a card. Tip: To make up for the lateness, write a longer, more individualized message to the receiver…I prefer doing this anyways.

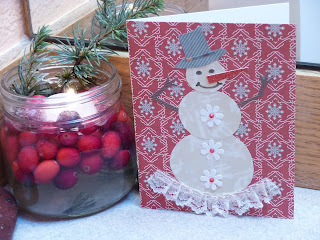
I made these cards with my boyfriend’s sister while down in California (at the end of November, a perfectly promising time to start Christmas cards if you do actually plan on handing them out on time). Since these were made a while ago, I only have pictures of the end product, but they’re pretty self-explanatory.

The Shopping List:
Card Stock
Old Magazines/Newspapers (i.e. National Geographic)
Glue
Ribbon/Lace
Scrapbooking Paper (or any decorative paper)
Scissors and/or Paper Cutter

These are the materials my boyfriend’s sister had on hand from her previous scrapbooking/card projects that I used, but feel free to use your imagination with whatever your heart desires. She created a cute card using scraps of decorative paper cut into a ribbon design with buttons on them.

The basic steps for card making are simple:

        *  Fold card stock in half or quarters (if not purchased this way)
2       *   Cut out decorative paper/magazine paper to fit card as a background and glue to front.
3      * Cut out shapes/design as desired, and glue those down.

      My best advice for making your own cards is to look online for inspiration, and then just go for it. Hopefully you’re better prepared than me, and will find this blog post more useful for next year. =)
     
      3 Days Until Christmas!

Thursday, December 20, 2012

Decor: Gift Card Envelopes


I love receiving gift cards for Christmas,--especially if they’re for a specific service, etc.--but let’s be honest, they’re not the most fun to give. Maybe it’s because we feel thoughtless handing someone a piece of paper or plastic? Or maybe because they’re often times given in generic cards, eliminating the fun of unwrapping them? For whatever reason, if you do decide to go with giving a gift card or certificate this year, here’s a fun way to wrap it that shows this gift took just as much thought as the others.

The Shopping List:
Paper Bag (whichever size, I used leftovers from the bag I used for yesterday’s gift)
Glue or Tape
Markers or Paint (I used acrylic paint)
Mod Podge Gloss (optional)
White Glitter (optional)
Ribbon
Hole Punch
Scissors
Paintbrush

Begin by cutting paper down to size for a card, leaving about 3-5 inches of excess in the length. Because I’m making this envelop for a certificate, my envelope will be on the longer side.

Fold up 1-2 inches of paper horizontally, and then fold half of the paper in vertically, followed by the other half to create the back side of the envelope. There should be a tiny bit of overlap with these folds to allow room for gluing or taping down. Glue or tape down. =)

Flip to front side and fold over most of the remaining excess to create a flap. You’ll want to leave enough room for a hole punch to go through without being obstructed by the card.  Fold corners of flap in and trim to create an envelope effect. 

Now for the fun part: decorate the front! I decided to paint a blustery winter day using white mixed with a hint of blue for a base of snow. I let that dry for a few seconds (I patted the snow scene on, so the paint wasn’t thick) and did a quick outline of trees using a darker green followed by a somewhat lighter green to create a more defined branch look. I let that dry for a minute or so and then mixed my snow colored paint with some Mod Podge and white glitter and quickly dabbed over the trees and paper for snowflakes/snow on the trees. None of this is very precise, but it comes together well. Allow to dry.

Hole punch two hole near the top/center of flap, spaced about 1 inch from each other. Put card in envelope and lace some ribbon through the holes, tying into a bow.

Sign envelope, and you’re done! A fun, thoughtful way to wrap a gift card!

5 Days Until Christmas!

Wednesday, December 19, 2012

Decor: Wrapping Paper


Ever since I was fourteen years old, I was our family’s designated gift wrapper. I wrapped everyone’s gift to everyone—including the gifts that were being given to me (of course, they were put into a different box first so I couldn’t tell what it was).  After wrapping a bounty of gifts, you start to get a little creative. Initially, this was in how I wrapped (“What new and interesting shape other than a square can I make?”); now, it’s in what materials I use.

I love making my own gift wrap—it’s cheap, fun, and generally looks better (in a DIY way which, as you can probably guess, I appreciate). Plus, it takes a lot more thought and care (and bragging rights). So today I’m going to show you how to make your own gift wrap: enjoy!

The Shopping List:
Paper Bags (any size)
Scissors
Ribbon
Tape or Glue
Markers or Paint (I used Sharpie paint pens)
Mod Podge Gloss (optional)
White Glitter (optional)

Start by cutting down the edge of one of the large sides of a paper bag. Now cut the other edge of that side. Cut out the base from the bag (see pictures). With the large piece of paper bag (whole), you now have enough material for a small to medium sized present. For a larger, present, simply glue or tape on other pieces of paper bag to the large piece.

Using the plain side of the paper, begin creating your design. You can choose to do whatever you want (drawing or painting on hearts, trees, snowmen, etc.), I decided to go with a basic swirl pattern. Starting at the corner, draw a curving line and end with a swirl design. From the part where the main curve begins, draw another swirl going in the opposite direction. Repeat this, alternating swirl size, until the entire paper is covered. You can do this with two or more alternating colors, or just use one. As you can see in the pictures, I originally started with silver and red, but my silver pen broke so I restarted using only red, and I like how it looks too. Paint pens dry incredibly quickly, so you don’t need to wait for the next step, otherwise, allow to dry.


For a glossy wrap, mix Mod Podge with white glitter and spread over paper. Warning: It is impossible to use tape on wrapping that has been Mod Podged, so you’ll have to glue the paper together as you wrap your present. Use only if you have extreme patience. Allow Mod Podge to dry, and you’re good to wrap your present as usual! 

My favorite way to decorate a present is with a traditional bow. To do this, take ribbon and pull a large amount of excess from the spindle (do not cut), and begin wrapping the ribbon width-wise around what you want to be the top part of your gift. Once you have it all the way around, twist direction and wrap length-wise. This should create an “x” on the bottom of your present. 

Once you have wrapped the ribbon back to the top of the gift, pull enough ribbon to tie a bow and cut from spindle. Take both loose ends and tuck them under the width-wise ribbon, pulling them out and tying them above the width-wise ribbon in a secure double knot.  Make a bow and double knot it. Trim ribbon ends to desired length. 

If you’re using a curling ribbon, curl by opening scissors wide and placing the ribbon over the blade. Place your thumb over the ribbon and apply pressure as you pull the blade down the ribbon at a fast pace. Repeat until you have reached desired curliness. Note: If you don’t have curling ribbon, attempting to curl will destroy the ribbon).
 
Sign who the gift is for, and your present is perfect! Stop by tomorrow for how to make your own envelope for gift cards!

6 Days Until Christmas!

Monday, December 17, 2012

Treat: Holiday Eggnog


 My family is somewhat unusual in the fact that the majority of us actually enjoy the taste of eggnog (and fruit cake…I know, we’re weird). In fact, one of my favorite things about December is the absolute glut of eggnog I consume in my coffee. So imagine my joy when my father let on that we actually had a family recipe for eggnog, but that he had just never made it in my memorable lifetime.  Now take that joy and mix it with a little bit of the exasperation I felt toward him when I found out just how easy the recipe was to make! What you have now is the perfect recipe for me writing a DIY on Holiday Eggnog. (You also have a very cheesy recipe inspired introduction, but you’re going to be very gracious with me about that because it’s the holiday season…right?)


 The Shopping List: (for one quart)
6 Fresh Eggs
1 cup White Sugar
1 qt. Heavy Cream (see note)
2-3 Tbs. Rum or Rum Flavoring
Nutmeg to Taste (I suggest using at least 1 ½ tbs. though)

Begin by whisking eggs together until they’re nice and foaming, but not peeking.

Whisk in sugar. Our family recipe says until the mixture is thick and has a lemony color…but that’s about a cup, so…

Add cream, rum, and nutmeg and whisk.  Check taste to see if you want to adjust anything (nutmeg, rum, etc.), and chill if desired.
 
It’s finished. So simple! I topped my father’s (I can’t drink eggnog straight), with some whipped cream, a splash of rum, and a sprinkling of nutmeg.

It’s snowing here in Washington…Keep warm, readers. =)

Note: If you’re like me and your stomach is too weak for the heaviness of eggnog, you can do a number of things to still be able to enjoy this wintry treat. If you prefer your eggnog plain, simply use a blend of half heavy cream, half a lower fat milk (I cut mine with soy milk because I’m semi-lactose intolerant). How I typically enjoy mine is by pouring about ¼ cup into my morning coffee. The coffee thins out the heaviness perfectly. Another way to cut the heaviness, for a more adult version, would be to add a bunch more rum to the mixture. The ratio would have to be to your own liking, so start off with a glass of eggnog and slowly add the rum until you’ve reached your desired consistency/flavor. Enjoy!

8 Days Until Christmas! 

Sunday, December 16, 2012

Gift: Aloe & Lavender Soothing Handing, Foot, and Body Cream


As promised, I bring to you a recipe for an Aloe & Lavender Soothing Hand, Foot, and Body Cream to go along with your Almond-Lavender Body Scrub. This cream is an intense moisturizer, as are most creams/lotions with a butter base. Why? Butters are typically derived from the fatty oil of the seed or nut of a plant (think of coconut oil and how it solidifies in room temperature). Of course, not all butters are made this way. Some, like aloe and lavender, are simply highly concentrated extracts mixed with a fatty oil (usually almond, coconut, or vegetable). While they may not be “pure” from the plant, they still contain all of the skin benefits of the plant, along with the nutrients from whichever oil they've been mixed with.

As I previously mentioned, lavender is renowned for its relaxing aroma. Aloe, on the other hand (no pun intended), is equally famous as a skin soother and healer. Its many uses range from healing burns to softening hair (when used as a styling gel), and is often kept in plant form within houses. Fun fact: aloe is actually edible, and can make a quite refreshing and delicious beverage. And without further ado, here’s how you make this luxurious cream:

The Shopping List
2 tsp Apricot Oil
1-2 Drops Eucalyptus Essential Oil (optional)

Aloe butter has a hard consistency, so start by melting it. You can do this either by microwave (watching to stop when butter melts), or by using a double-boiler.

Once melted, remove from heat/microwave and stir in lavender butter. The lavender butter should melt in the heat of the aloe butter.

Add your apricot oil and eucalyptus essential oil and stir. I like to add a small amount of eucalyptus essential oil to products with lavender because I find it brightens the smell of the flower, but it is otherwise unnecessary; so if you don’t have it, don’t buy it.

Allow your cream to cool, stirring occasionally. Once you have a nice, creamy consistency, scoop into container(s), decorate, and you’re finished! Simple stuff. I’m using small plastic containers so that this cream can be thrown into a bag and used on-the-go as a repairing hand cream, but you could use any ol’ container your heart desires. =)

9 Days Until Christmas!

Saturday, December 15, 2012

Treat: Popcorn Tin Recipes


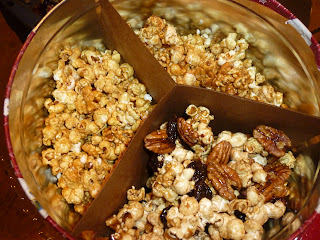
Traditionally, popcorn tins are made up of an original (butter), a savory (cheddar), and a sweet popcorn (carmel). But seeing as we all know the carmel corn is the only flavor worth going for (as previously mentioned), I decided to recreate the concept of traditional popcorn tins using only variations of carmel corn. So, roll up your sleeves, get some popcorn going on the stove (or air popper—do not by any means use popcorn from a microwave bag), and get ready for the best tasting tin you’ve ever had.

Carmel corn is one of those things that can either be incredibly simple to make, or horribly complicated. Thankfully, my mother has a recipe that falls under the simple category, and is even made using the—wait for it—microwave. Now for me, microwave cooking is almost akin to blasphemy of some sort; but this carmel corn is just so darn delicious, I don’t care. All of these recipes stem from the original recipe, so we’ll start with that one first.

Original (Plain Carmel):

Begin with your popcorn. If you’re making this on the stove, turn your pan onto high heat and add 1-2 Tbs oil (my favorite is peanut, but vegetable or canola oil would work well). Once hot, pour in 1/3 cup popcorn kernels, cover and shake occasionally. Pull off heat six seconds after the sound of popping has stopped.  

While the kernels are busy popping, ready your carmel mixture. Into a microwave safe bowl place one cube of butter, 1 cup brown sugar, ¼ cup corn syrup, and ½ tsp salt. Set aside (without mixing) until kernels have been popped.  Pour popped kernels into an empty brown paper bag, and place carmel mixture into the microwave.

This is where it gets semi-tricky since microwave heat varies. Microwave carmel mixture until it starts to boil (mine starts a little after one minute). Once you see the boil begin, microwave for two minutes. As soon as the two minutes are up, pull from microwave and whisk in ½ tsp baking soda.  

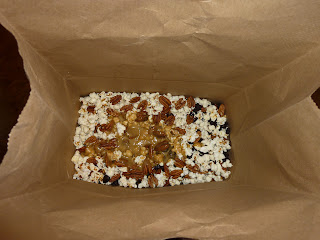
Pour carmel mixture onto popcorn in brown paper bag, fold top over, and shake vigorously. Place bag in microwave for 1 ½ minutes. Shake and place back into your microwave for another 1 ½ minutes. Shake, place back into microwave for 1 minute, and shake. Fun. =) Open the bag and check to see if the popcorn has been thoroughly coated over with carmel. If it looks evenly distributed, spread out into baking sheet and allow to cool. Once cool, break up carmel corn and set aside. I don’t suggest putting it into the tin yet, see note below for my reasoning.


Savory (Carmel Corn and Salted, Roasted Peanuts):

Follow original recipe, only inside brown paper bag with popcorn add 2 ½ - 3 cups whole salted, roasted peanuts. You may want to add a bit more carmel than the original recipes asks for, but I didn’t and it turned out fine.

Sweet (Carmel Corn with Dried Cherries and Pecans):

Again, follow original recipe with the addition of placing 1 ½ cups dried cherries (or cranberries), and 2 cups whole pecans in with the popcorn before adding the carmel sauce.  If desired, use more carmel sauce than in the original recipe.

Note:

When putting the carmel corns into a tin, try to do it at an even pace (one cup of each at a time). The dividers tend to slide and are hard to adjust once a section is full.

Eat up and enjoy!

10 Days Until Christmas!

Thursday, December 13, 2012

Gift: Almond-Lavender Body Scrub


Lavender has been touted as the ultimate relaxant for decades (and then some), but for most of my life I haven’t been able to stomach the smell. Unfortunately for me, it just so happens to be my mother’s absolute favorite aroma. Because of her love, I’m trying to embrace this pretty purple flower—and you know what? It’s not all that bad.

Regardless of whether or not you’re mad for lavender, you’ll love this exfoliating body scrub. But if you genuinely can’t handle the smell, simply sub the lavender out for a different soft petal, or nothing at all—it’s mostly there for scent and visual appeal. This one’s for you mom! <3

The Shopping List:
3 Tbs Ground Almond*
2 Tbs Brown Sugar
1-2 Small Handfuls Lavender Petals
Avocado Oil (amount varies)
1-3 Drops Eucalyptus Essential Oil (optional)
1 Tea Light (optional)

*Make this yourself by grinding almonds in a coffee grinder

This scrub is incredibly simple to make, and even easier to adjust if you don’t have, or don’t like the ingredients. You really only need one of the exfoliating agents (brown sugar, extra-fine ground pumice, ground almond), but using a mix does make a difference since each has its own benefit.  

Sugar is known as a skin softener, but brown sugar—aside from being in a more natural state than processed white sugar—is slightly finer of a grain, which is important when choosing an exfoliant. Too harsh of one may damage your skin, as well as hurt you during the process.  

Almond is another skin softener, with the added benefits of omega fatty acids, which aid in skin cell production.

Pumice is one of the best exfoliators on the market for really sloughing away dead skin cells, but it is important to get as fine a grain as possible, for the aforementioned reasons. As a side, I don’t recommend ever using pumice as an ingredient in any facial product—the skin there is too sensitive to play around with).

Add all dry ingredients to mixing container excluding the tea light. Mix thoroughly. Add avocado oil while stirring until you reach a semi-paste consistency. The scrub shouldn’t be too liquid-y, but you don’t want a mix that’s too dry to scoop out and spread on the body easily.

I prefer avocado oil for scrubs because it’s quite a heavy oil, yet still has little aroma (unlike olive oil). I choose heavier oil for scrubs because I still wash after using them, but feel free to substitute lighter oils such as sunflower, apricot, almond, or even straight up vegetable oil.

Add in a few drop of eucalyptus essential oil, and more lavender petals if desired. Stir and spoon into jar.

For a fun touch, I like to top off the scrub with a layer of lavender petals and a tea light. The petals can either be stirred into the scrub later, or poured directly into a bath for a spa-like experience.  You can give this scrub away on its own, or in a set along with a lavender cream (DIY coming soon). Either way, it’s sure to please.

12 Days Until Christmas!

Wednesday, December 12, 2012

Gift: Earring Picture Frames


I know I promised some carmel corn recipes, but I actually plan on using the carmel corn tin as a gift for a Christmas party I’m attending later this week. And since I want to avoid handing out stale carmel corn, I’m going to procrastinate making that DIY for a few more days.

Don’t despair though, because today I’m going to show you how to make an affordable, and artsy chic gift for a friend: a frame to hang your earrings in.

The Shopping List:
Paint in Choice of Colors (I used Acrylic)
Lace fabric (optional)
Old Pictures Frames (I purchased mine from the Goodwill for $1.99 ea.)
Staple Gun
Screening
Paintbrush

Begin by removing all backing/glass from the frame. If you want to have the earring frames hung on a wall, make sure you find frames that have that already set up for you (because it’s easier that way). Another fun idea is to use a frame that has a stand. If this is the case, just remove glass from frame.


Repaint your frame! This will require a few coats for an even finish (I did three). Make sure you allow the paint to dry after every coat. Note: I did this in both blue and silver, the silver covered much more quickly than the blue, and dried faster as well. The print I made also showed up better on the silver frame. (See below).

Once frames are completely dry, lay lace material over frame and carefully paint over lace in contrasting color. Immediately remove lace and continue print on other sides. My lace design didn’t turn out quite as I desired, partly because the frames I was using had ridges on them, but I still like the almost tarnished effect the frames now have with the occasional flower design. Allow paint to dry overnight.

Cut out screen a little larger than needed for frame. Place over backside of frame and pull tightly as you staple around the edges. You want as taut of a screen as possible to provide extra support for the earrings. Trim excess screening and you’re done!


You could either give the frames as is, or add a cute pair of earrings (already in the frame, of course) to the gift.

13 Days Until Christmas!